Showing posts with label just fun. Show all posts
Tuesday, November 18, 2014
Project Winter Card
I entirely forgot to post this yesterday, but it's even more appropriate today because baby, it's cold AND windy outside! I love that song, and had fun assembling this card from some Project Life supplies.
Everyone has been buzzing about Stampin' Up! carrying Project Life, and it looks like a great way to scrapbook to me...except that I now do my scrapbooking exclusively with My Digital Studio. So I haven't purchased any of the cards, and saw them in person for the first time when I was at my aunt/upline's Stampin' Loft.
Stampin' Up!'s Project Life cards are just lovely, and make holiday (or anytime) card making quick and easy. I picked out this "baby it's cold outside" card, choose to pair it with Crumb Cake and Coastal Cabana, and quickly had a card to mail.
That said, I hope it's warmer where you are.
Cheers!
~Melanie
Stamps: Holiday Home
Ink: Silver Encore, Coastal Cabana blendabilities
Paper: Crumb Cake, Coastal Cabana, Seasonal Snapshot Card Collection
Extras: Frosted Sequins
Monday, November 10, 2014
Sparkly Santa
I had to do some traveling last week, and only part of it was planned, so everything has been up in the air. But a great thing was that I visited my aunt and upline in her Stampin' Loft (aka, my stamping heaven!) and got to play with some fantastic stamps that I don't have. I also got oodles of inspiration from all the things she's been doing to get ready for the holidays, so stay tuned.
I just love this fun card that we made. More fun with blendabilities! Santa looks so real, and so cheery with his rosy cheeks, not to mention all that snow in his beard. It's a pretty simple card to make, and I'm sure it will be lots of fun to receive.
Two quick notes before you make your own:
- Remember that Dazzling Details needs time to dry! I didn't have a lot of time, since I had to get back on the road, and his beard is a little smeared. Still cute, but not as perfect as when I made it.
- To only use the borders from Just Sayin', you'll want to put a piece of scotch (or wash) tape over the sentiment and use markers to do the inking. That way you won't get any shadow stamping from leftover ink, and have the perfect space to insert your own greeting.
That's all you need to know. Go have some fun with your own Christmas card making!
Cheers!
~Melanie
Stamps: Santa Stache, Just Sayin', Good Greetings
Ink: Memento Black, Blendabilities in Cherry Cobbler, Skin Tones, and Calypso Coral
Paper: Cherry Cobbler, Glimmer White, Whisper White, Silver Glimmer
Extras: Mustache Framelits, Word Bubbles Framelits, Silver Sparkle Dazzling Details, Itty Bitty Accents punch pack
Wednesday, October 29, 2014
Haunted Houses
Though I've been stamping for years, I've never made a Halloween card. So this is my first, and I rather love it. The Holiday Home stamp set is primed for every holiday, and was so much fun to play with. I wasn't planning to make a Halloween card, but once I got done coloring and cutting out my houses, I really wanted to use that ghost to pop out of the chimney...and things just went from there.
Some of my favorite things here are how bright the houses are--thanks to Blendabilities! I didn't do much shading, since the spaces are so small, but these markers are also fantastic for loading up with vivid color. They remind me of cartoon houses.
I'm also in love with the little details: the spider on the door of the middle house (yuck!), the bats winging back and forth, and that perfect little jack-o-lantern that shows on the inside of the card as well. Too cute!
So, I hope you're ready for Halloween and that, even if things are spooky, they are also so much fun.
Cheers!
~Melanie
Stamps: Holiday Home
Ink: Memento Tuxedo Black, Basic Grey, Early Espresso, Pumpkin Pie, Blendabilities in Calypso Coral, Rich Razzleberry, Cherry Cobbler, Coastal Cabana, White Stampin' Chalk Marker
Paper: Whisper White, Smoky Slate
Extras: Homemade Holiday framelits
Friday, October 24, 2014
Baby Smiles
Of course, I had to make a baby card to go along with the library starter pack I shared on Wednesday. But, since I don't have kids or many baby stamps, I wasn't sure what I would have to work with. A quick look at my stamp shelves and I knew I was in luck, thanks to one of Stampin' Up!'s many all-purpose stamp sets. This little ducky is from Embellished Events, and it was fun to ink up with my markers for a bright image.
I also love the sentiment, which isn't a traditional baby sentiment but fits just perfectly: "So many smiles...begin with you." How true! Once I found that couplet in Petite Pairs, this card came together really quickly and I got my package out on time. That's a personal win-win.
This card also fits my "flashback friday" goal, since I used some retired DSP for the front, inside and coordinating envelope. I just love how quick it is to make a "fancy" envelope with the Envelope Punch Board. If you don't have one...well, what are you waiting for?
Wishing you a wonderful weekend, full of smiles!
~Melanie
Stamps: Embellished Events, Petite Pairs
Ink: Memento Tuxedo Black, Marvelous Markers in Daffodil Delight, Tangerine Tango, Real Red, and Pacific Point
Paper: Pacific Point, Polka Dot Parade, Tangelo Twist, Gumball Green, Whisper White
Extras: Chalk Talk framelits, Bitty Banners framelits, Envelope Punch Board
Friday, October 17, 2014
Hello Polka Dots
After making and falling in love with Wednesday's card, I wondered what else I could create using the same techniques. So I started with the Dots decorative mask, a sponge dauber, and Island Indigo ink. When I pulled the mask away, I was in awe of the lovely watercolor look that I had created by not inking each circle fully...and I didn't want to cover that up!
So I flipped through my framelits, and found this script hi in the Circle Card set. I cut that out of Silver Glimmer paper--with adhesive sheets underneath it, of course, for easy glueing and cropped a word bubble from Calypso Coral using the Word Bubbles framelits.
I think this makes a great anytime card, and I'm going to have to make a lot more because I don't think I can bear to part with this one!
Cheers!
~Melanie
Ink: Island Indigo
Paper: Whisper White, Calypso Coral, Silver Glimmer Paper
Extras: Dots and Stripes Decorative Masks, Word Bubbles framelits, Circle Card framelits, sponge daubers, dimensionals
Wednesday, October 15, 2014
Golden Joy
Another from my long crafting weekend. I first saw this technique and this card on Mary Fish's blog, and I immediately knew I had to make it for myself.
First of all, I thought layering and building up the "Joy" cut out was genius, and I love how it gives the card easy dimension as well as instant interest--in person, you can see that the layers below the gold foil are Island Indigo.
Secondly, while I might have used the Stripes decorative mask diagonally, I would have never thought to use only partially color it in. I also love how the smears of ink give the card a clean and abstract look.
It's so simple, and so pretty! If you want to make one of these yourself--and you should--check out Mary Fish's video on how to use Adhesive Sheets before you use your framelits. It makes this gorgeous card much easier than it looks.
Cheers!
~Melanie
Stamps: Endless Birthday Wishes
Ink: Blackberry Bliss, Island Indigo
Paper: Gold Foil, Island Indigo, Whisper White
Extras: Wonderful Wreath framelits, Dots and Stripes Decorative Masks, Sponge Daubers
Tuesday, October 14, 2014
All In on Blendabilities
I hope you had a lovely long weekend! Mine was great--it was the first time in quite a few weeks that we stayed at home, which meant that I had lots of time to play with my newest Stampin' Up! goodies, as well as some old favorites. Creating is relaxing and so much fun!
I'm sharing this card first because I think that Blendabilities are my new favorite thing. Blendabilities are alcohol markers that come in sets of three shades of the same color, so you can shade and blend (hence the name) to give your coloring dimension. Stampin' Up! first introduced them over the summer, and I wasn't sure that they would be for me. I thought they'd be too fussy and, as much as I love the SU's regular markers, I rarely color with them. (I use them to ink parts of stamps.)
After playing with Blendabilities for the first time on Sunday, I can say that I was wrong and these are definitely for me and for everyone else! You start with the darkest shade and overlap the medium and then the lightest, which gave an old favorite--Pleasant Poppies--a whole new way to pop off the card stock. I just love how much these look like real flowers or printed paper, and can't wait to get more colors in Blendabilities and try them on everything.
This was super easy, lots of fun, and is just gorgeous. I can't wait to get this card in the mail.
Cheers!
~Melanie
Stamps: Pleasant Poppies
Ink: Memento Black, Pear Pizzazz
Paper: Whisper White, Canteloupe Crisp
Blendabilities: Cherry Cobber, Pumpkin Pie, Coastal Cabana, Rich Razzleberry, Calypso Coral
Friday, October 3, 2014
Flashback Friday
Time to use my scraps! I love designer series paper, but never use it up before I fall in love with the new patterns. So I've challenged myself to use up what I have on hand...and I have a LOT on hand, so this might be a regular feature.
First up is Orchard Harvest from last year's holiday catalog. I did a quick search on Pinterest for some inspiration, and found this great card that Mary Fish made. I just love the layout, and am likely to use it again many times.
But I don't have the Autumn Accents Bigz die. I was disappointed...until I realized that I had the digital files in My Digital Studio, and I could use them with my ecutter. Score!
And then I had lots of pretty patterned leaves, so I also made these cards. Not bad for forcing myself to use my stash, right?
What will you do with your paper stash? Have some fun and enjoy autumn this weekend!
Cheers!
~Melanie
Stamps: Four You
Ink: Early Espresso, Island Indigo
Paper: Orchard Harvest DSP (retired), Island Indigo, Very Vanilla, Early Espresso, Raspberry Ripple (retired)
Extras: My Digital Studio
Friday, September 26, 2014
Jazzing Up Jam
If anything, this has been the summer of canning, and specifically of making jam. I've seen great things on all sorts of blogs, and read lots of magazine articles, about how easy and flavorful it is to preserve your own food...but I'd been reluctant. My husband pushed me though, because he really wanted to try making jam and save/savor the summer. So we made our first jam, a vanilla rhubarb in early June and there's been no stopping me since! (The link will take you to the recipe, and to my favorite canning site thus far, Food in Jars).
Of course, as I was assembling all those mason jars and making sure they sealed (they did!), I was thinking about the really cute but now retired Perfectly Preserved and matching framelits. I let mine go last summer, thinking it was cute but that I didn't really use it. Alas! And then...My Digital Studio to the rescue!
You can get the stamp images as a download in MDS...which I had already done, because I do think the jars are super cute, and so I decided to make custom labels for my jars. I sized them and tried to get as many on the page as possible in MDS, where I also gave them some of my favorite colors for the fabric lids: Real Red, Pacific Point, Rich Razzleberry and Old Olive. Then I exported the file to my ecutter software, printed them on sticker paper, cut around the jars and I was ready to label! The image above is of a full sheet...minus a few labels.
Here's another shot of my finished product. And there are lots more labeled jars in the cupboard, just waiting for winter days. I can't tell you how exciting this whole process has been, from trying my hand at jam making (there are a few "peach paste" jars that we don't need to talk about...) to creating my very own labels for them. One hint though: write on your labels before putting them on the jars. It's much easier that way!
And if you're wondering about that tomato jam, it's divine. Here's the recipe, and I recommend that you try some on meatloaf, or with eggs if that's your thing. Yum!
Cheers!
~Melanie
My Digital Studio: Perfectly Preserved
Wednesday, September 24, 2014
Bag Tags
Getting away from cards for a second so I can share these great gift tags. Stampin' Up! punches make these tags easy to make (or mass produce) and they'll add a fun touch to any gifts you give. For these, I used the new stamp set About the Label which has one of my favorite things--coordinating punches! So I stamped my little gift bags, then choose coordinating colors for the "hb2u" labels.
Does anyone use HB2U? I easily figured out what it meant, but hadn't seen that text shortcut before. The labels are punched and popped up on dimmensionals for a 3D effect.
Also, a short cut in your own tag making--I decided that I like the size on the right best. It started off as a 2x3 inch piece of card stock.
Cheers!
~Melanie
Stamps: About the Label
Ink: Bermuda Bay, Crushed Curry, Blackberry Bliss, Calypso Coral
Paper: Whisper White
Extras: Little Labels Punch Pack, Scalloped Tag Topper punch, Dimmensionals
Friday, September 19, 2014
CASE-ing the Catalog
When I got the annual catalog, I immediately fell in love with Flower Patch--and this is mostly because of the gorgeous cards featured on page 154 and 155 of the catalog (though I always love a good flower stamp, especially when it's layered!) So I decided to C.A.S.E.--Copy And Share Everything--the cards on that page.
Did you know that Stampin' Up! publishes the card ingredients for every project in the catty? It's true! So if you aren't sure what color you're looking at, you can always look that up. But they don't tell you what size the card is. So I first made the card as a normal 4.25 x 5.5 card, and it just looks a little funny. The spacing is off and I felt like I needed extra leaves. Hmm, I thought, maybe that's a notecard?
So I tried again with a 3.5 x 5 card, and everything fit into place. But I think this looks great at both sizes, and I will certainly make some more.
By the way, I noticed that I thought my colors were off--or at least darker than the catalog--when I was making these cards. But as the ink dried, the colors lightened considerably, so keep that in mind as you work with the photopolymer stamps. I don't know what it is, but something about the way they ink up seems a bit fuller than the clear and wood mount stamps. Yet everything is beautiful once it's dry.
Floral cheers!
~Melanie
Stamps: Flower Patch
Ink: Crisp Cantaloupe, Calypso Coral, Melon Mambo, So Saffron, Crushed Curry, Bermuda Bay
Paper: Whisper White
Thursday, September 18, 2014
Confetti Thanks
While it has been a busy few weeks, I certainly haven't lost my love for this confetti look. This is my first card using Dotty Angles, and I just love it. It's so easy to layer the dots and you don't need to worry about precision to make a card--or a stack of cards--like this one. I think I might whip some up in fall colors, and in holiday colors, to get a head start on the busy-ness of the coming months.
Cheers!
~Melanie
Stamps: Dotty Angles, Another Thank You
Ink: Bermuda Bay, Crushed Curry, Melon Mambo
Paper: Whisper White
Wednesday, August 27, 2014
You're how old?
We all know that cards for guys are hard...and they get even harder as the guys get older! I had to make two this past weekend and didn't know what to do, until I remembered my Calling All Heroes stamp set. This is one of Stampin' Up's special photopolymer offerings (you won't find it in the catalog) and it's AWESOME!!!
I'm especially a fan of that dotty sky and the cityscape, but the comic letters are what takes the set over the top--endless possibilities!
I mean, how perfect for a funny inside? I also thought about "I'd wear a mask too" but I was running out of time.
I'm going to have lots of fun with this set!
Cheers!
~Melanie
Friday, March 7, 2014
Happy Friday!
This stamp just makes me so happy! I love the bold look, and how much fun with the matching framelits! I hope this card will also bring some happy into my friend's day...it's on it's way to her right now.
Happy Friday, and have a great weekend!
~Melanie
Stamps: Starburst Sayings
Ink: Coastal Cabana, Real Red
Paper: Sahara Sand, Whisper White, Fresh Prints
Extras: Big Shot, Starburst Framelits, Banners Framelits
Happy Friday, and have a great weekend!
~Melanie
Stamps: Starburst Sayings
Ink: Coastal Cabana, Real Red
Paper: Sahara Sand, Whisper White, Fresh Prints
Extras: Big Shot, Starburst Framelits, Banners Framelits
Friday, February 28, 2014
Hello, Ombre
I just love how this card turned out! I used Background Builders with my Stamp-a-majig to perfectly line up the patterns and create an ombre card. This card also introduced me to what I think is going to be a personal favorite color combo--Crisp Cantaloupe and Calypso Coral. So bright and springy!
Sadly, it isn't quite springy here yet. It was way too cold and windy to take my photo outside, so I tried to use the natural light coming through the window...and you can can see some shade from the window panes. At least it was a bright day!
Cheers!
~Melanie
Stamps: Background Builders, Four You
Ink: Pink Pirouette, Blushing Bride, Crisp Cantaloupe, Calypso Coral, Melon Mambo, Strawberry Slush, Primrose Petals, Sahara Sand
Paper: Sahara Sand, Whisper White, Crisp Cantaloupe, Calypso Coral
Extras: Labels collection framelits, Big Shot
Sadly, it isn't quite springy here yet. It was way too cold and windy to take my photo outside, so I tried to use the natural light coming through the window...and you can can see some shade from the window panes. At least it was a bright day!
Cheers!
~Melanie
Stamps: Background Builders, Four You
Ink: Pink Pirouette, Blushing Bride, Crisp Cantaloupe, Calypso Coral, Melon Mambo, Strawberry Slush, Primrose Petals, Sahara Sand
Paper: Sahara Sand, Whisper White, Crisp Cantaloupe, Calypso Coral
Extras: Labels collection framelits, Big Shot
Monday, February 24, 2014
Sparkles & Chevron
It was warm and sunny here this weekend--what a change! I took advantage of the sun to capture the sparkle of this card, which is going out in many directions tomorrow. One for a friend who finished her dissertation (yay! she did it!) and another for a friend who needs a reminder that she's awesome (she can do it!). I love how this fun card works for both just perfectly.
I also love the chevron and the gold. Don't you?
Cheers!
~Melanie
Stamps: Positively Chevron, Feel Goods
Ink: Bermuda Bay, Rich Razzleberry
Paper: Smoky Slate, Rich Razzleberry, Whisper White, Champagne Glimmer Paper
Extras: Big Shot, Labels collection framelits
Monday, June 25, 2012
Floral Fun
This fun and bright card is just right for summer, and I got my inspiration from Stampin' Success, a magazine full of great ideas for stamping and for your business that all demonstrators receive. It's another great perk!
This card features Bright Blossoms front and center, with a few embellishments from the Designer Buttons, Hemp Twine, Adorning Accents dies, and Adorning Accents embossing folders. The sentiment, which is from Fabulous Florets, perfectly tied things together for this happy anytime card.
Don't forget! You have until this Friday, June 29 to enter our blog candy contest by leaving a post on last Friday's post.
Cheers!
~Melanie
Stamps: Bright Blossoms, Fabulous Florets
Ink: Gumball Green, Real Red, Tangerine Tango, Daffodil Delight, Tempting Turquoise, Rich Razzleberry
Paper: Crumb Cake, Whisper White, Real Red, Tempting Turquoise
Extras: Big Shot, Brights Designer Buttons, Hemp Twine, Adorning Accents die, Adorning Accents embossing folders
Wednesday, June 20, 2012
Golden Peacock
This one's for Kiran! She loves all things peacock, so I knew the instant that I saw the World Treasures stamp set, that it would be on the top of Kiran's list. Guess what? I was right. :) And this peacock is ever so lovely, with so many options...but, given my ongoing love of all things embossing, my first choice was to emboss in gold. Look at that shine!
I chose my color palette--Pacific Point and Rich Razzleberry--from the colors in the International Bazaar DSP. And then I used the DSP as background for this lovely bird. Do you recognize that layout? It's exactly the same as Monday's treasured friend card, minus the sentiment, and its one that I can use again and again.
I hope you love the peacock as much as we do, and that you'll check in for more uses of International Bazaar on Friday.
Cheers!
~Melanie
Stamps: World Treasures
Ink: VersaMark
Paper: Pacific Point, Rich Razzleberry, Whisper White, International Bazaar DSP
Extras: Gold embossing powder, Postage Stamp punch
Monday, June 11, 2012
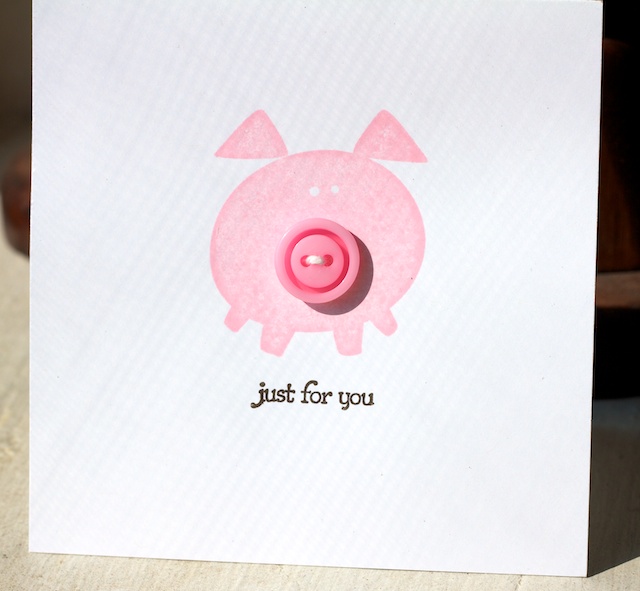
Plump Little Piggy
Here's another quick and easy card made with Button Buddies and perfect for any occasion. Wouldn't it be great with a piggy bank for a new baby? I say yes!
Have a great Monday!
~Melanie
Stamps: Button Buddies, Teeny Tiny Wishes
Ink: Pretty in Pink, Early Espresso
Paper: Whisper White
Extras: Brights Designer Buttons, Linen Thread
Friday, June 8, 2012
Slow and Steady Wins the Race
These snails are just adorable. Normally I'm not a fan of slimy things (you should have seen me with the tree frog that followed us in the house the other night!), but these little guys are just too cute to be gross--even without the buttons!
As promised, here's a piece of our BIG NEWS: Kiran is now a certified wedding planner, and working with two friends in the planning company Pretty Little Details. I'm thrilled for Kiran, and we're both excited that we have an extra excuse to work on more wedding stationary...stay tuned for more on that front.
Cheers!
~Melanie
Stamps: Button Buddies, Teeny Tiny Wishes
Ink: Early Espresso, Pumpkin Pie, Marina Mist
Paper: Whisper White
Extras: Brights Designer Buttons, Linen Thread
Subscribe to:
Posts (Atom)